Quotation form
In the following article we use a spreadsheet as the starting point for a customer quotation form that we want to add to our website. Additionally, we use Basin a third part service to collect the data from our interactive form.
Interactive web form
The form above contains two parts. The first two fields are classic contact form inputs: name and email. The fields below are much more interactive. Select a certain quantity of T-Shirt (>11) and a discount applies. The final price depends not only on the amount but also on the size of the T-Shirts you order. Click Submit and we will get directly notified about your T-Shirt inquiry!
This kind of interactive form can be used in many professional cases: estimate the house insurance based on surface and year of construction, calculate delivery prices based on city and delivery time, etc. This way customer leads coming from your website are better qualified. In addition of the contact data you have already an idea of what your customer inquiring is about.
How to create a web form with Excel ?
This quotation tool above was created with an Excel spreadsheet and converted into a web form with Appizy. You can use the “Quotation” tool in Appizy examples as starter template.
Spreadsheet construction
The spreadsheet has two tabs. One for the user interface itself. A second one for the intermediate calculations and dropdown values. The second tab is hidden before conversion.
There are also two important construction steps:
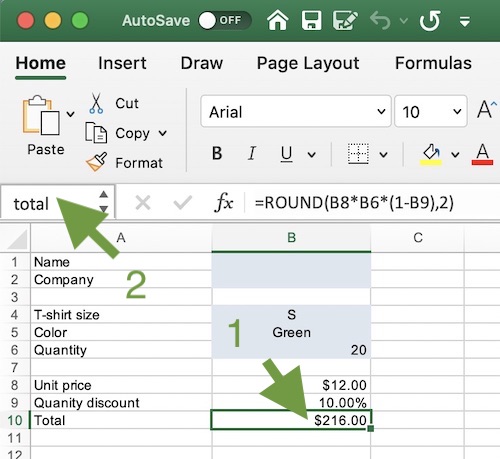
Naming cell: as we want to gather data on form submission, we need to tell Appizy which cell we want to collect. To do so we select each cell and give it a named reference. For example, in the Quotation example the cell B10 is named “total”.
More about named range creation can be found on Excel official documentation.
Empty text field: to create the two blank inputs at the beginning of the form (“Name” and “Email”) we reference this cell in the second tab. For Appizy a cell is converted into an input field only if it is referenced in another formula. There is no real computations done with the name of our client. We simply reference it in the Data tab with the simplest formula to have a blank input field: =Interface!B1. We also name the cell “name” to gather this field at the moment of form submission.
Conversion settings
In Appizy we choose the following conversion settings:
Content & Layout > App layout: Fluid (requires PRO or PLUS), so our app will fit the parent content.
Integration > Toolbar > Send data button (requires PRO or PLUS). This will add a Send button below our form. When the end user clicks on it, the form is submitted and we get the information contained in it.
Integration > Toolbar > Form endpoint (requires PRO or PLUS). This is where we paste the URL provided by Basin after we created a new form in their interface.
Package > Split files (optional, requires PLUS). We take advantage of split files (HTML, CSS and Javascript) for an easy integration in our website.
Website integration
After Appizy conversion, 90% of the development work is done. We add a few CSS classes to fit our theme based on Bootstrap. That is it! We are ready to get qualified customer leads from your website!
Basin can do much more than collecting data at submission and send them over email. You can also connect your account to Zapier. From there you can imagine any sort of workflow triggered on form submission.
Engagement concerns and data integrity
If you calculate a price in your web form, we advise you to mention that this is only an estimate and can be subject to change once they have reached your sales team.
Also remember that every calculation runs in the client browser. It means they can be malicious or faked. Don’t trust a client who get magically a beautiful discount out of nowhere.